Category Archives: Recipes

Welcome 2026 With Hasselback Taters!

Sheree and I wish everyone a deeper sense of personal health, inner balance, and daily joy!

My Word of the Year is “Captain,” and I can hardly wait to paint my little sign to set up as a reminder. When I get that done, I’ll share with you how I will apply this one word.

Have you set your intention for 2026 yet? Let me know in the comments.

Okay!

New topic for the new year!

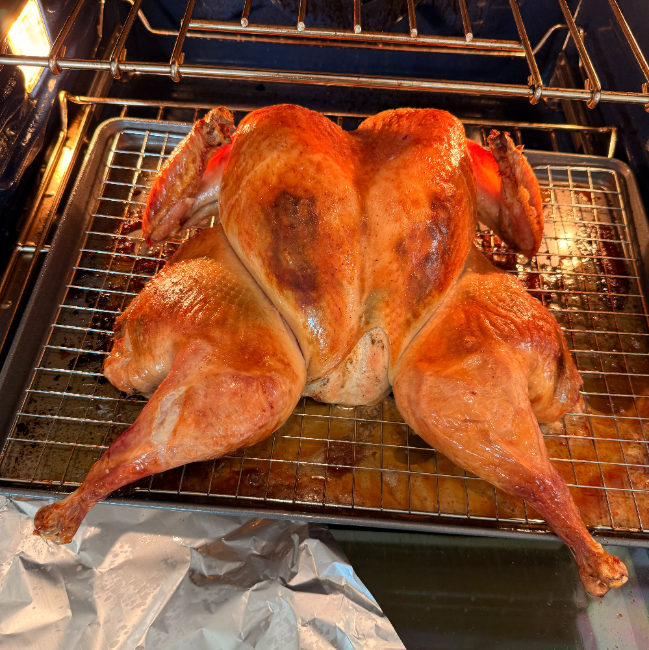
First, we conquered ‘spatchcocked,’ when we opened the turkey for a more even roasting process that yielded the juiciest meat ever for Thanksgiving.

It’s interesting to note that ‘spatchcock’ comes from 18th century Ireland and Britain. It seems it is a shortening or degradation of the phrase, “to dispatch the cock.”

Cock, meaning a rooster or young chicken.

Dispatch, meaning to prepare or cook it quickly – and, in my imagination, to grab the bird, put an end to it quickly and efficiently, and then prepare it.

Just saying.

In any case, we have DISPATCH + COCK, to become SPATCHCOCK – which perfectly describes how removing the backbone and flattening the bird will cook it faster and more evenly. Doing this was popular in the taverns of old to save time and was often done with chickens and small game birds.

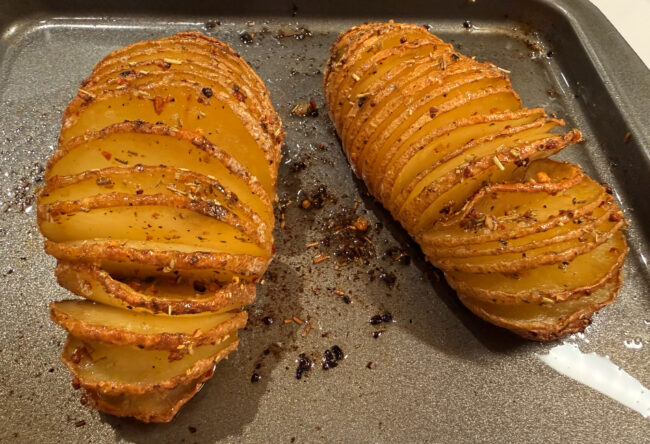
Now, for today’s strange term, Hasselback baked potatoes!

No. Nobody is getting hassled.

Hasselback potatoes comes from a place name and a dish that was created there.

In the 1950s, a chef-in-training named Leif Elisson, developed this technique at the Hasselbaken Restaurant in Stockholm, Sweden.
Potatoes were thinly sliced – but not all the way – then baked until crispy on the outside and tender on the inside.

While being aware of this technique for years, I resisted doing it. I can only ask myself ‘why,’ because not only is it easy to do, but it’s a rip-roaring crowd pleaser!

Here are the steps for Hasselback Potatoes (Download Below):

Preheat oven to 425 degrees F.

Using a cutting board, place the potato between chopsticks, which will prevent the knife from completing the cuts. Make thin cuts – about 1/8 inch thick (a little less than 1/2 cm). Be mindful that the first cut or two may go through all the way depending upon the shape of the potato, so stop cutting at the ends before hitting the chopsticks.Melt a combination of butter and Extra Virgin Olive Oil to equal 2 tablespoons for two potatoes – along with salt, pepper, and seasoning of your choice. I like to add snipped chives or a herb mixture.

Brush half the oil on top of the two potatoes.

Bake uncovered in a baking dish for 30 minutes.

That’s it! Serve and enjoy!

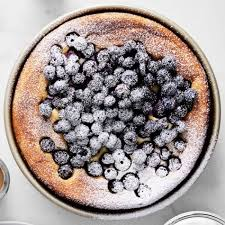
Visually appealing and oh, so yummy!

In health –

Deidre

We welcome our new subscribers and hope our weekly tidbits help you out – one meal, one breath, and one movement at a time!

Rescued by Chia Seeds

Well, I didn’t intend to ignore my obligations, but that’s what I almost did.

Our trusty editor, Sheree, just sent a subtle message, “Hey … got a post for me?”

In other words, “Hey, the Tuesday post is going out, uh … tomorrow … we don’t have anything for our readers!”

Gulp!

After completing the Caregiver Summit last week I had been preparing for since early spring, we celebrated the positive reception of my message, packed our bags, and headed out the next day for a long-awaited trip to Disney World!

The cold snap that is affecting the mid-Atlantic on up north, is also affecting the southern Atlantic states. The low in Kissimmee, Florida, where we are staying is 36 F tonight – and the high tomorrow is slated to be 59 F.

We abandoned the idea of seeing the fireworks-light show-water fountain display at Epcot again tonight because we didn’t bring parkas. To top that off, Sheree is making snow men in West Virginia!

Since our accommodations have a full kitchen, I knew we would be taking many of our meals in whenever we were not at Disney World.

How do you approach vacation cooking and meal prep?

Our first stop coming into Kissimmee was to go to the grocery store.

To compliment the assorted nuts, peanut butter, crackers, chia seeds, fresh berries (blueberry, black berry, and raspberry), and apples, we picked up almond milk, two bottles of protein-boosted smoothies, coffee, gluten free cereals, eggs, Greek yogurt, gouda, sliced ham, sour dough bread, mustard, butter, hummus, and guacamole.

Travel and eating out can create havoc for the “smooth functioning of the intestines.”

To ward against getting “backed up” we regularly consume chia seed pudding. Recipes vary, but this is what I am currently doing:

Chia Seed Pudding – per individual serving

In a small bowl or a small glass (that will hold about 10 ounces) stir together:

2-3 tablespoons chia seeds

1/3 – 1/2 cup flavored smoothie (these can contain added sugar, so I don’t use a lot)

1/3 – 1/2 cup almond milk

2 – 3 Tablespoons of Greek yogurt (can be fruit flavored to blend in with the flavor of smoothie you use)

A handful of fresh fruit that compliments the other flavors.

Download your copy of Chia Seed Pudding below:

Depending upon the amount of chia seeds and fluid used – and if you refrigerate this overnight – this “pudding” can thicken enough to need a spoon or can be thin enough to drink.

Along with proper daily hydration, and eating whole food with lots of fiber, chia pudding can be our best friend – especially when traveling.

In health –

Deidre and Remi

I sure hope we get to see Remi’s Ratatouille Show in Disney this week! They were having technical difficulties today.

Hunting For Hummus? We Can Help!

We have always liked hummus. We buy it frequently, and I have made it on several occasions. But, during our Tucson adventure recently, we ate A LOT of it!

A restaurant soon became our favorite in Tucson because of its hummus. The Pita Jungle offers an appetizer plate with three kinds of the delicious spread, along with enough pita bread to dip into – until your heart’s content.

And we did!

Especially our two-and-a-half year old grandson. We couldn’t figure out which of the three flavors was our favorite – tried as we might.

So, upon returning home, we longed for some delicious hummus – homemade, please! Why? Because, there is a difference!

Good hummus is, generally, thick and smooth; and gives you the impression of heaven – floating on a pillow-soft, airy-like fluffy cloud! Ahhhh!

After perusing old messenger entries – I use messenger like a filing cabinet for things I want to remember. Do you do that? I found a video of some fellow who seemed to know his way around a chickpea, so I followed his lead.

While the ultimate recipe for hummus may start with dried chickpeas/garbanzo beans, I used the tried-and-true canned variety, using two cans – equal to 3 cups – of chickpeas.

Before throwing those chickpeas into the food processor, however, there’s a secret first step!

After draining and rinsing the canned chickpeas, put them into a saucepan, cover with water, and add 2 teaspoons of baking soda. Bring it up to boil and lower it to a simmer for 5 minutes. The hull of each chickpea will be released.

When the time is up and the hulls are starting to release, remove the pan from the stove, pour off the water and the hulls, adding cold water to stop the cooking and aid in eliminating the hulls.

In practice, the hulls were released but did not easily pour off. I ended up skimming and manually removing most of the hulls as I placed the hull-less chickpeas into the food processor. I look forward to improving my pouring-off technique. If most of the hulls are removed, that will be fine.

To the food processor with the chickpeas, add the juice of one lemon, ½ teaspoon of Kosher salt, and 2 cloves of garlic.

Process this mixture for 7-8 minutes. The mixture will get warm so don’t be alarmed.

Add 1/3 cup of tahini to the mixture, about 2 tablespoons of extra virgin olive oil, and process for 3 more minutes. The tahini is added late because its proteins would otherwise cause a coagulation of the hummus, which cannot be reversed.

Taste test for any desired seasoning adjustments. We felt it needed more salt and garlic, but I couldn’t add more raw garlic at this point, so we settled on a couple additions of garlic salt with a tasting in between additions to guide us. A few pulses from the food processor did the trick.

Transfer this very warm cloud of hummus to a bowl and place it in the refrigerator for three hours to cool.

Please feel free to download the recipe below!

At home, we used tortilla chips to scoop up this delightful dish. It can be stored for a week in the fridge.

We served it at a party we held; and are now enjoying lunches consisting of a few chips and our hummus and some leftover homemade guacamole – you couldn’t ask for a healthier snack.

I hope you will try making your own cloud of hummus soon!

In health – (and hummus!)

Deidre

November is National Family Caregiver month! Show your love and concern for caregivers you know by sharing my caregiver series with them:

Toolkit for Caregivers

Toolkit for Caregiver Emotions

Thanks!


Feeling Hot, Hot, Hot!

It’s too darn hot!

Ninety-five percent humidity can take its toll!

It is summertime here in the Northern Hemisphere, and finding cooler ingredients and cooking methods is a priority.

Got meat? Grill it outside, please – no added heat in the kitchen!

For the rest of the meal? I keep turning to salads.

Cool, crisp, full of veggies salads.

No label reading is needed for these whole foods.

Until …

Maybe we think using bottled dressing would be an okay shortcut?

Truth be told – I have succumbed to the sirens of bottled dressing from time to time – even the pricey ‘good ones’ touting no chemicals – but they break all the rules for homemade goodness and freshness.

I know folks who always splash on just enough oil, balsamic vinegar, salt, and pepper to do the job.

That sort of works for me in the winter, but …

Lately, I’ve been into whole meal salads featuring high protein, gluten-free pastas!

First, we need some flavorful salad dressing to pull it all together!

So, grab a small mixing bowl and add as many of these ingredients as possible – I didn’t have the shallot, or enough lemon juice and it turned out fine!

Dressing

½ cup extra virgin olive oil

¼ white wine or champagne vinegar

2 Tablespoons lemon juice

2 teaspoons Dijon mustard

1 Tablespoon fig preserves (honey will do nicely)

1 small shallot finely chopped

2 cloves garlic, finely chopped

½ cup mixed fresh herbs: dill, oregano, basil

Salt and pepper to taste

A sprinkle of chili flakes, if desired

Whisk the ingredients well and set aside.

Then, cook 1 lb. or 1 box of salad pasta of choice to al dente. I like using chickpea or red lentil pasta for the protein boost, which makes this salad a full meal.

Once cooked to al dente, drain the pasta and toss with the dressing so all those yummy flavors can coat each piece!

Assemble a montage of ingredients in an over-sized salad bowl such as:

Two heads of Romaine lettuce, sliced

½ of a head of Radicchio, sliced

A sampling of nitrate-free salami, pepperoni – I use turkey based when available – sliced

1-2 cups of cherry tomatoes, halved

A variety of olives, torn or sliced

Bell pepper, chopped

2-4 Tablespoons of sliced pepperoncini

A cup or more of fresh basil leaves, torn

A cup of mozzarella cheese balls – these may be halved or quartered if they are not mini size

A cup of provolone cheese, cubed

Shaved Parmesan to taste

As a concept recipe, I never always have all the ingredients, so types and quantities of ingredients will vary.

Once the salad is assembled and tossed, add the pasta with its dressing and toss thoroughly.

Served fresh with the pasta still warm, or cold from the refrigerator, this is a satisfying meal!

If we have some grilled meat, I will thinly slice the hot meat and arrange the slices on top of each serving of salad.

Bring on the iced sangria!

In health –

Deidre

Dear Readers:

Be a surprise blessing to a friend or family member who is a caregiver by sharing this link with them to Toolkit for Caregiver Emotions. Better yet, buy a copy for them as a gift! Also, the eBook is on pre-order for $0.99 with delivery on August 19th!

Time For Some Egg Stretching!

Eggs have long been my main source of breakfast protein. With the price of eggs going crazy right now, I have had to rethink how many we are consuming.

Hmmm. How do you stretch an egg?

I’ve shared a couple recipes recently that have featured cottage cheese – an often-overlooked source of protein.

Thankfully, I do consume dairy without serious adverse effects. A little more flatulence, perhaps, but with the price of eggs, it’s worth it – and its creamy deliciousness is delightful.

Recently, I tried out a frittata recipe featuring sauteed minced potatoes, assorted veggies, optional meat, and – EIGHT … count them – EIGHT EGGS!

Egads!

I cracked one into the mixing bowl. Two. Three. Four. Gulp … Five …

Okay! No more! Nuh-huh!

Clearly, I needed more protein – more stuff – to complete the liquid required to pour over everything.

Enter three dollops of cottage cheese.

The result was yummy in every respect.

“Wait!” you say.  Your family turns its nose up whenever you offer cottage cheese? No worries!

Simply blitz your egg/cottage cheese mixture using an immersion blender or food processor and voila! You have turned the combination into creamy wonderfulness! No one will be the wiser.

Shhh! Our little secret.

Below is how I tweaked the JenSmiley@substack.com recipe. Again, this is a concept recipe that is perfect for modifications based on what’s in the refrigerator.

How are you dealing with the rising egg prices in the United States?

In health –

Deidre

Don’t miss the next post! Subscribing is easy and hassle-free. Just one email every Tuesday morning with the link to the latest post. Scroll down to the bottom on your device to fill out the subscribe form. Thank you!

Stuffed French Toast – A Different Kind of Yum!

Before you entertain visions of thick sliced bakery bread cleverly slit open and stuffed with a fluffy, cheesy, sweet cloud of decadence … hold it right there. We are going in an entirely different direction.

Think yummy, eggy French toast topped with savory goodness.

Think making it the night before, if you wish, so there’s only the baking to be done the next morning.

Think enjoying the leftovers the next day with no effort!!!

Yes!

Best of all, it’s a ‘concept recipe’ that’s easily adaptable to ingredients on hand.

We’ve developed a saying at home to describe using the last dab of anything. We call it ‘community service.’

We are performing an act of community service when we eat that last piece of cheese, drink that last half-glass of kombucha from the bottle, or heat up that half-bowl of soup languishing in the refrigerator.

When preparing this week’s version of Stuffed French Toast, I used the last four okra, looking for a home. The week before, there were a few seasoned oven-roasted potato wedges that were put to good use.

As you look over this concept recipe, imagine how you might adapt the ingredients to what you have on hand.

Stuffed French Toast

Grease a baking dish sized to fit a single layer of the bread component.

Place slices of bread at the bottom of the dish to cover the entire area. Sourdough is our bread of choice.

In a sauté pan, crumble and cook ground breakfast sausage. For a square 8–9-inch glass pan, I used 1/2-pound ground sausage.

When the sausage is almost cooked, add some diced onion, maybe bell pepper, mushrooms, fresh okra (oh, yes!), cut up leftover roasted or baked potatoes, or anything else that suits you and might assist in community service.

Continue to cook and brown the mixture until the sausage is cooked, the onion becomes translucent, and the veggies begin to brown.

Meanwhile, in a medium bowl, whisk eggs, a dollop of heavy cream (half and half will do, but the heavy cream is the yummiest – having said that, you can ‘thin’ the heavy cream with water if more fluid is needed). Season with salt and pepper. For the square baking dish, I used six eggs.

Spread the sausage and vegetable mixture over the bread layer. If desired, sprinkle grated cheese on top.

Pour the egg mixture evenly over the top.

At this point, you can cover and refrigerate this overnight or put it into a preheated 350-degree oven and bake for 30-35 minutes or until a knife comes out clean.

Download the recipe here:

The square pan made four servings – two for now and two for later! I left it in the oven a few minutes too long and things got a bit browner than I had wanted, but we both agreed that it was a yummy breakfast!

Now, that’s community service in the kitchen at its finest!

In health –

Deidre

Next week, I will post the results of my following my own advice: how I found energy and a mindset that changed the path of my day. Make sure to subscribe to foodtalk4you so you will not miss a single post delivered directly to your in-box Tuesday mornings!

Caregiver Confessions

Note: Make sure to read until the end to catch an important tweak to last week’s Cottage Cheese Blueberry Bake.

This week’s post is a confession – or, more accurately – a sharing of a recent revelation.

In the final editing process for the content in my next book, Toolkit for Caregiver Emotions, I am making sure to mention, those who are short-term caregivers might experience the same mindsets and emotions experienced by those who are long-term caregivers.

Hah! Little did I know I was going to be a short-term caregiver, who would experience some of those same things.

My sweetheart just had hip replacement surgery. We’re looking at a six-to-eight-week standard recovery for general mobility issues.

Meh. No big deal, right?

Caring for someone with post-op pain concerns, decreased mobility, and who uses a walker along with other adaptive equipment is not the biggest hurdle ever for me.

I found, however, that my role as the primary caregiver, helping with activities of daily living, (such as bathing, dressing, and bathroom needs) – along with managing a variety of new temporary medications – quickly put me at risk of falling into a mindset of self-neglect.

Granted, there are no raging, random caregiver emotions here. The first two to three days post-op were hard on both of us – it’s a shared experience – but as I observed myself, it was easy to see self-neglect wiggle its tenacles into my day.

As we both experienced for the first time all the hip replacement concerns – the ice pack apparatus, careful spacing of pain meds, frequent transfer concerns with bed/chair, home exercises, movement restrictions, and dealing with the side effects of medications – we were both frequently exhausted.

Then it happened.

“My sweetheart is all set now; I’m just going to rest – I can skip my shower and my daily vitamins.”

In those first two days, I think such a mindset is normal. The importance of caregiving being a priority is evident as our kitchen island has been taken over by medical paperwork, and a row of short-term medications serves as a reminder to administer them on time.

But, dear caregivers, going beyond that initial adjustment period with self-neglect is not healthy.

Remember, there are two patients in any caregiving situation – the person giving the care and the person receiving the care. Ignore the needs of the first one and the needs of the second one might not get met because the first one may have collapsed!

If your adjustment period is not getting better – as ours did, thankfully – then it’s time to call in for help. Use those offers of assistance to free up time for your daily selfcare.

Next week, I’ll be sharing another breakfast casserole recipe that was easy to prepare in advance and gave us a fresh-from-the-oven treat this morning – no big clean up – and a promise of another easy meal the next day.

Speaking of recipes – as I prepared that Cottage Cheese Blueberry Bake again this week, I paused after stirring the ingredients a final time. Hmmm. Wasn’t there oatmeal in the version I baked the first time? Friends, caregiver brain is a real thing. Yes – please add one cup of uncooked oatmeal to that recipe. Apologies for any inconvenience or recipe “flops.” Sheree is reposting the downloadable corrected recipe below.

In health and healing –

Deidre

We love receiving your comments when foodtalk4you resonates with you. Thanks for alerting us if there is a malfunction in any links that are shared. We are here to help and to shine a light on topics that can boost the health we are all designed to enjoy. Thank you for subscribing!

How ‘Bout A Little Loco Moco?

Food from around the world is so fun to explore. Often, regional dishes reflect the beauty and the unique features of that area and often include an interesting background story.

My daughter and son-in-law introduced us to a special dish from Hawaii during our recent visit there that brings comfort food to a bowl.

The dish – Loco Moco – was reportedly created in 1949 in Hilo, Hawaii, at the Lincoln Grill Restaurant. Owners, Richard Inouye, and his wife, Nancy, were responding to a request from some teenagers from a local sports club – who were requesting an alternative to a sandwich that was inexpensive and could be quickly prepared.

They asked Nancy to start with rice in the bottom of a bowl, add a hamburger patty, and cover the whole thing with brown gravy. Eventually, a fried, sunny side up egg would grace the creation’s top.

But the name – Loco Moco – adds another fun fact.

The teens named the dish after one of their members, George Okimoto, whose nickname was “Crazy,” because of his crazy teenage antics. Another member of their group, George Takahashi, (right), who was studying Spanish in high school, thought of using the name, Loco, which is Spanish for crazy. They added, “Moco,” to the name which, “rhymed with loco and sounded good.”

I’m wondering if the boys chose “moco” as a variant of “moto” in George’s name to complete the naming for their crazy friend?

To qualify as the genuine dish, the ingredients must be assembled in order, and the egg must be sunny side up. Stacking a second layer is allowed to retain the name, but layers must be in the order of rice-hamburger, patty-gravy, sunny side up egg.

Below is “Keeping It Reele’s” version of stacking a Loco Moco

Variations in choice of meat, or any other ingredient, require a different name such as, “Spam Loco,” “Kalua Loco,” or “Shrimp Loco.”

Loco Moco can be found in restaurants all over Hawaii and has been featured in several cooking shows.

Does Loco Moco fit into a foodtalk4you style diet? As a regional treat? Absolutely!

Our eggs were organic and locally farm raised. The meat was organic. The gravy and white rice were treats.

Yum!

Aloha – in health –

Deidre

To receive a once-a-week link to each Tuesday’s edition of foodtalk4you, just subscribe by scrolling to the bottom of your device screen or by scrolling to the top on the left side of your computer screen. We will not bother you with endless emails and your information is never shared.

Mahalo – that’s thank you in Hawaiian!

The Magic of a Wink!

Tonight, many of us are anticipating the arrival of a Jolly Old Elf, putting his white-gloved finger next to his nose as he bids us adieu for another year.

And that wink!

Winks are full of joy, mischief, and an inside secret.

Well, I’m sharing a little bit of a secret with you right now.

An easy little cookie that seems to wink at you!

Yes, I am speaking of my previously published Almond Macaroon recipe, now updated and even better, as Almond Winks.

These are gluten free, with that over-the-top sweetness of almond paste ramped down, making these little jewels into a ‘wink’ sure to please.

So simple to create, you can whip these up today in time for a family treat, and in time to leave for Santa as he speeds through his rounds in the wee hours.

Thanks go to our own magic elf, Sheree, who is making this recipe easy for you to download and print!

In my test kitchen today, I used a different method of baking. Note the mid/lower oven rack and the one about 4 inches above it. That beginning of a golden color in the cookies was achieved by baking the first 20 minutes on the lower rack – and then finishing on the top rack for 4-6 more minutes, making sure to not over bake.

Best wishes for peace, love, and joy in all our hearts, regardless of our beliefs.

In health –

Deidre 

NOTE FROM SHEREE: With both Deidre and I being grandmothers, (yes, believe it not), and being the Christmas season, I wanted to post something special relating to warm memories of grandmothers baking cookies with their grandchildren. Hope you enjoy it.

GRANDMA’S SECRET RECIPE

Grandma’s in the kitchen,
with a smile so wide,
mixing up a potion, and I’m by her side.
She says it’s magic, and I believe it, too.
With a sprinkle of laughter,
and a pinch of, “I love you.”
Her cookies are the sweetest,
and the hugs are the best.
Grandma’s secret recipe
beats all the rest!

Unknown author

Merry Christmas, everyone – God bless you all.

Sheree

That’s Nuts!

With the holiday party and baking season upon us, we turn to the subject of nuts. We’re talking about walnuts, pecans, cashews, and the like.

Nuts can be a powerhouse of nutrition with fiber, healthy oils, and beneficial phytonutrients that cut down on inflammation and ramp up heart health, blood sugar balance, and so much more.

But there can be a downside to nuts, depending on how they are treated.

Longtime readers of this blog or my book, Toolkit for Wellness, know that raw nuts are better than nuts highly processed in unhealthy oils.

But raw nuts still have factors in them that can inhibit proper absorption of nutrients and can contribute to unhappy tummies.

Enter the ‘activated nut,’ which has been handled in such a way as to eliminate the anti-digestive phytates and to activate beneficial digestive enzymes instead.

Activated nuts require soaking first, followed by dehydrating.

To soak:

Use glass bowls, if possible. Metal bowls may discolor but can be cleaned using Bar Keeper’s Friend.

Dissolve approximately 1 teaspoon of sea salt in 6 cups of water, add raw nuts, and soak. I buy large bags of nuts, so this requires multiple bowls.

Walnuts, almonds, and pecans can soak 12+ hours; cashews take just 6 hours. The water will turn quite brown.

Using a large colander, thoroughly rinse soaked nuts and spread out on towels. I have a large bath towel dedicated to this process – some staining may occur. Roll the towel up and let the towel soak up any extra moisture for a few minutes.

If nuts are to be used in a blender or food processor, they can be used now; but if long-term storage is desired or if they are to be used in baking, dehydrating is necessary.

To dehydrate:

If using a dehydrator, spread nuts out in a single layer on each tray needed, allowing for good circulation of air around the nuts. Do not crowd them. Place trays in dehydrator. Set temperature to 115-125 degrees and set timer for 12 hours.

When time is up, check for dryness and lengthen the time as needed. Store in a closed container in a cool environment.

If using the oven method, spread nuts out on large baking trays without crowding them. Set the oven at its lowest temperature. Since oven heat will be higher than the dehydrator, the drying time will be shorter. Stir nuts every hour and check for crispness after 6 hours.

Freezing nuts will lengthen their shelf life.

The resulting nut is light, crisp, and brimming with goodness!

I mostly activate pecans and walnuts, but now that my trusty dehydrator has found a place in my new home, I will return to activating almonds and cashews again as well. The brown outer covering of the soaked almond can be pinched off prior to dehydrating if desired.

Happy, healthy snacking and baking –

Deidre

Sharing is caring! Use the options under the MORE button below to share with family and friends.